In the PCB design process, a bill of materials (BOM) is required for component purchasing and assembly; however, verifying the accuracy of information can be tedious. If any part numbers, manufacturing information, or distributor information needs to be corrected manually, it’s common for typing mistakes to occur. Guarantee an accurate, zero-touch BOM that requires no alterations with a centralized component database and real-time distributor information in OrCAD Capture CIS.
This how-to will provide step-by-step instructions for automatically generating a zero-touch BOM as well as creating a template to accelerate future BOM creation.
How-To Video

Generating a Bill of Materials
Step 1: Open a design in OrCAD Capture CIS 17.4.
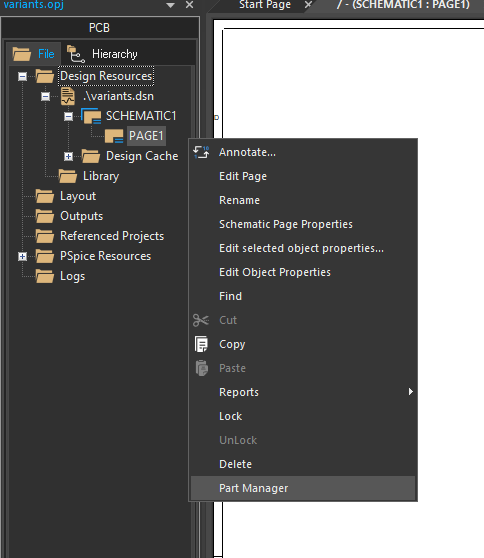
Step 2: Right-click on the desired schematic page and select Part Manager.

Step 3: Select Reports > CIS Bill of Materials > Standard from the menu in the Part Manager Tab.
Configuring the Bill of Materials
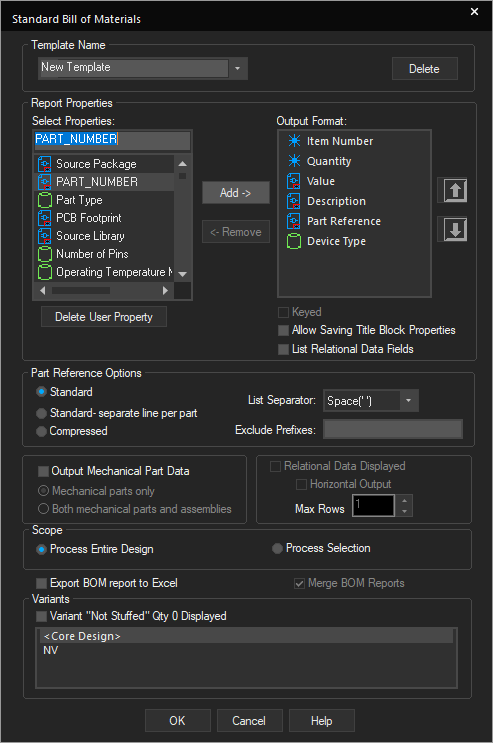
Step 4: Under Select Properties, choose PART_NUMBER and click Add.
Step 5: Arrange the output format as desired. Select a property then select the corresponding arrow to move a property up or down in the list.
Step 6: Select the desired settings to customize the BOM output.
Note: The following settings can be customized in the Bill of Materials:
Under Part Reference Options, select between the following:
- Standard: Matching parts are grouped into one line item.
- Standard separate: Each part is listed on individual lines, even if multiples of the same part exist.
- Compressed: Matching parts are grouped with a range when possible.
Under Output Mechanical Part Data, choose to include mechanical parts or assemblies.
Under List Relational Data Fields, choose to include multiple part manufacturers if defined in the component database.
Under Scope, choose whether to process the entire design or just the selection.
Under Variants, choose which design variant will be used to create the BOM if multiple variants exist.
Step 7: Ensure Export BOM report to Excel is not selected.
Note: This will open a new tab directly in OrCAD for the Bill of Materials.
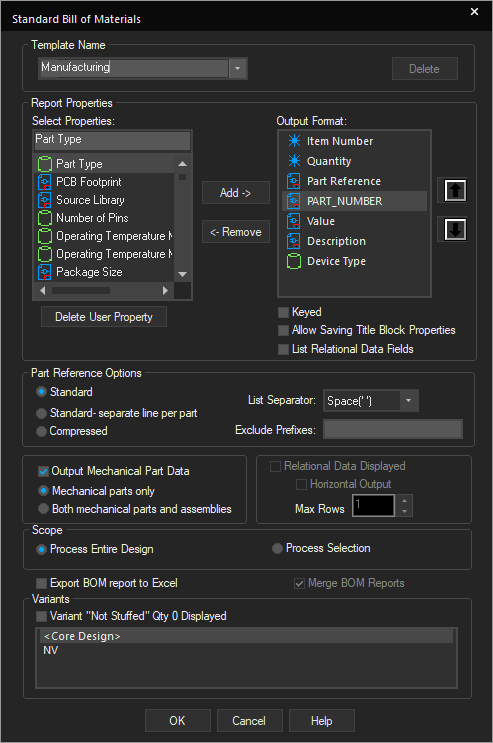
Step 8: Change the template name to Manufacturing.
Note: This will save a new template to be used in future designs, containing all the defined settings for the desired Bill of Materials.
Generating a Bill of Materials
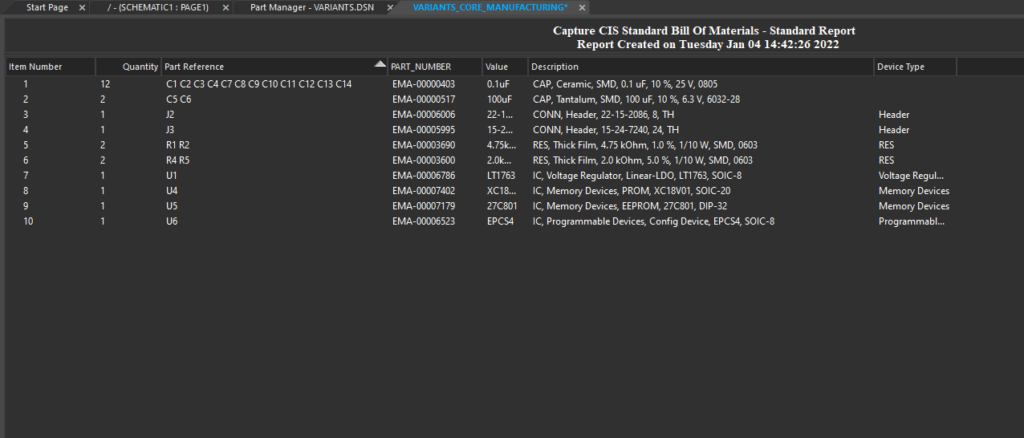
Step 9: Click OK. View the generated BOM.
Step 10: Close out of the new tab. Select Reports > CIS Bill of Materials > Standard from the menu in the Part Manager.
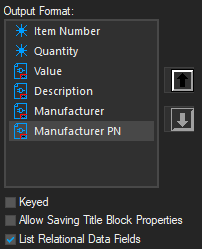
Step 11: Under Select Properties, select Item Number and click Add.
Step 12: Complete this process for the following properties:
- Quantity
- Value
- Description
- Manufacturer
- Manufacturer Part Number
Step 13: Select List Relational Data Fields.
Step 14: Check Relational Data Displayed and set the Maximum Rows to 5.
Step 15: Change the template name to Purchasing.

Step 16: Check Export BOM report to Excel and click OK.
Note: This will open the BOM as an Excel spreadsheet to easily share with project stakeholders, purchasing, and manufacturing.
Wrap Up & Next Steps
Expedite BOM generation, ensure accurate component information, and create consistency throughout the entire team with Bill of Material customization in OrCAD Capture CIS. For more information on generating a zero-touch BOM and in-depth training on additional features, view our E-Learning and instructor led courses for OrCAD Capture CIS.
